A leaking stopcock is a common fault in domestic and commercial plumbing systems. The stopcock controls the incoming mains water supply to a property and allows the flow of water to be isolated when repairs or emergencies occur. If this valve leaks, seizes, or fails to shut off correctly, the result can be property damage, wasted water, and serious complications during urgent plumbing work.
For plumbing professionals and trainees entering the trade, understanding how and why stopcocks fail is essential. Accurate diagnosis helps determine whether a valve can remain in service or whether replacement is the safer and more reliable option.
In the United Kingdom, plumbing work must comply with the Water Supply (Water Fittings) Regulations 1999, which aim to prevent contamination, waste, misuse, and undue consumption of water. Products and fittings that are commonly used to demonstrate compliance with these regulations are often WRAS approved, meaning they have been tested for suitability in UK water systems.
This article explains how a stopcock works, the most common failure points that cause leaks, and when replacement becomes the only dependable fix.
What A Stopcock Does In A Plumbing System
A stopcock is an isolation valve installed on the main incoming water supply to a building. Its purpose is to allow the water supply to be shut off when maintenance, installation, or emergency repairs are required.
Most properties have two main isolation points associated with the incoming supply.
External stop tap
The external valve is usually located in a chamber near the property boundary, often in a pavement box or driveway cover. This valve may be operated by the water supplier or by a qualified plumber when access to the main supply is required.
Internal stopcock
The internal valve is installed inside the property where the supply pipe enters the building. It is commonly located under a kitchen sink, in a utility space, or near the point of entry of the service pipe.
The internal stopcock is the primary isolation valve used during most plumbing work inside the property.
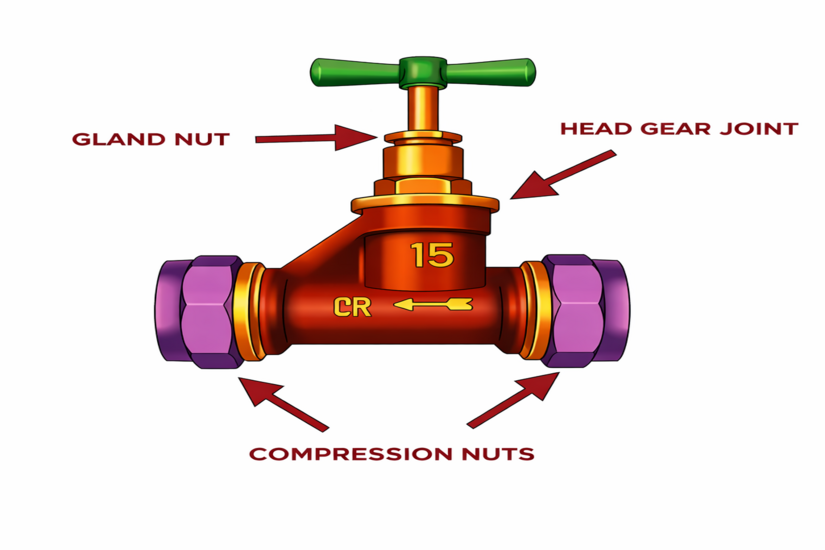
Traditional stopcock designs use a screw down mechanism where a threaded spindle compresses a sealing component against an internal seat to stop water flow. Other isolation valves used in modern plumbing systems may use different sealing mechanisms while serving the same isolation function.
Why Stopcocks Begin To Leak
Stopcock failures usually develop gradually. Age, mineral deposits, corrosion, and lack of operation all contribute to deterioration inside the valve. In many properties the valve may remain unused for years. When it is eventually needed during a leak or pipe failure, the internal components may already be worn or seized. Several common failure points account for most leaking stopcocks.
Failure Point One: Deterioration Of Internal Sealing Components
Traditional screw down stopcock designs rely on internal sealing components that press against a valve seat to stop water flow.
Over time these components can harden, deform, or wear due to constant water pressure and mineral buildup. When this occurs the valve may no longer shut off completely.
Typical symptoms include:
- Water continuing to flow after the valve is closed
- Persistent dripping from taps even after isolation
- Reduced ability to fully shut off the supply
In older valves the condition of the internal sealing components is only one part of the assessment. The valve seat and internal body surfaces must also remain in good condition for reliable operation.
Failure Point Two: Gland Seal Or Spindle Packing Leakage
Many stopcocks include sealing material around the spindle to prevent water escaping along the valve stem.
This seal can deteriorate over time due to age, pressure changes, or repeated valve movement. When the seal begins to fail, water may appear around the handle or spindle area.
Common signs include:
- Moisture around the valve spindle
- Mineral deposits forming near the handle
- Leakage that becomes visible when the valve is operated
A small leak from the gland area may sometimes be reduced by carefully adjusting the gland nut. However, persistent leakage can indicate internal wear that requires further assessment or valve replacement.
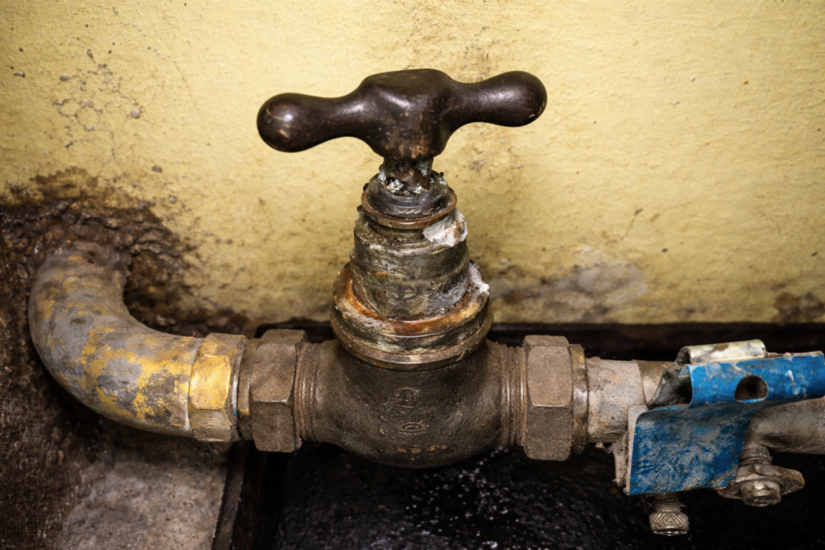
Failure Point Three: Corrosion Inside The Valve Body
Internal corrosion is a frequent issue in older brass stopcocks that have been exposed to decades of water flow and mineral deposits.
Corrosion can damage the valve seat or create rough surfaces inside the valve body. When this happens the sealing components cannot form a proper seal.
Indicators of corrosion related failure include:
- Continuous dripping even when the valve appears closed
- Rough or stiff movement when operating the valve
- Visible corrosion around threaded sections
Corrosion within the valve body is often a strong indication that replacement may be the most reliable long term solution.
Failure Point Four: Seized Valves
Stopcocks that are rarely operated can become stiff or seized. Scale buildup, mineral deposits, and corrosion can restrict movement of the internal spindle.
Attempting to force a seized valve can damage the spindle or compromise the gland seal.
In severe cases the spindle can break, leaving the valve stuck in position.
Periodic operation of isolation valves during routine inspections helps reduce the risk of seizure and confirms that the valve remains functional.
Failure Point Five: Stress On Pipe Connections
Stopcocks are sometimes installed where pipework is under tension or poorly supported. Movement in pipework can place mechanical stress on the valve body or compression fittings.
This stress can lead to leaks developing at connection points or around threaded sections.
Signs of connection stress include:
- Leaks appearing at compression joints
- Visible pipe misalignment near the valve
- Movement of pipework when the valve is operated
Correct pipe support and careful installation help prevent these types of failures.
When Stopcock Replacement Is The Only Reliable Fix
Some stopcock issues can be managed temporarily through minor adjustments. However, certain conditions indicate that replacement is the safest and most dependable option.
Professional plumbers typically recommend replacing the stopcock in the following situations.
Severe Internal Corrosion
If corrosion has damaged the valve seat or internal body surfaces, the valve may never shut off reliably even if sealing components are replaced.
Persistent Leakage After Assessment
Leaks that continue after gland adjustment or inspection often indicate deeper internal wear.
A valve that cannot reliably isolate the water supply should not remain in service.
Structural Damage
Cracked valve bodies, distorted threads, or damaged spindle mechanisms compromise the integrity of the valve and require replacement.
Poor Accessibility Or Reliability
In some properties the existing isolation valve may be difficult to operate, poorly located, or unreliable. Replacing the valve with a properly installed modern isolation valve improves maintenance access and emergency response.
Safe Replacement Considerations For Plumbing Professionals
Replacing a stopcock involves isolating the water supply and working on pressurised plumbing systems. Work must be carried out using safe plumbing practices and in accordance with UK water regulations.
Key considerations include:
- Confirming the external supply can be isolated before work begins
- Draining the pipework to control residual water pressure
- Installing fittings suitable for compliance with the Water Supply (Water Fittings) Regulations 1999
- Ensuring the new valve is accessible for inspection and maintenance
Correct pipe alignment and support should also be checked to avoid mechanical stress on the new valve. Products used during replacement are commonly selected from WRAS-approved fittings to demonstrate suitability for use with UK potable water systems.
Preventing Stopcock Failure Through Routine Checks

Although age related wear cannot always be avoided, simple routine checks can help ensure isolation valves remain operational.
Operate The Valve Periodically
Turning the stopcock fully off and then reopening it during routine inspections helps prevent seizure and confirms the valve remains functional.
Check For Early Signs Of Leakage
Minor moisture around spindle seals or joints should be investigated early before leaks worsen.
Maintain Accessibility
The stopcock should remain visible and accessible. Isolation valves that are hidden behind fixed fittings or cabinetry can delay response during plumbing emergencies.
Why Stopcocks Are Critical In Plumbing Emergencies
A working stopcock is one of the most important control points in any plumbing system. During a burst pipe or major leak, quickly isolating the incoming water supply can significantly reduce damage to a property. For this reason plumbing professionals should always verify that the main isolation valve is functional when carrying out plumbing inspections or system upgrades.
An unreliable stopcock introduces risk because the water supply may not be shut off quickly when needed. Routine inspection of isolation valves ensures that the plumbing system remains safe and manageable during unexpected failures.If you want to understand the steps and common pitfalls before you start, Tradefox breaks down trade basics in a practical, easy-to-follow way.
Conclusion
Leaking stopcocks are a common issue in plumbing systems, particularly in older installations where valves have experienced long periods of wear or inactivity. Understanding the common failure points helps plumbing professionals determine whether a valve can remain in service or whether replacement is the more reliable option.
A stopcock that leaks, seizes, or fails to isolate the water supply properly should be replaced to maintain system reliability. Correct installation using suitable fittings and good plumbing practice ensures that the valve will operate effectively when it is needed most. Maintaining accessible and functional isolation valves is a key part of protecting properties, preventing water damage, and ensuring safe plumbing operation.