



Ask ten fitters what separates coving from cornice and you will get answers ranging from “nothing, it’s the same job” to a full breakdown of profiles, plaster grades and fixing methods. Both terms describe mouldings that run along the junction of wall and ceiling, and both are fixed by the same trades, so the confusion is fair.
But the distinction matters on site. The two products behave differently when it comes to weight, proportion, cutting, fire performance and the finish a client expects. Getting it right protects your reputation, your material budget and, on heavier plaster runs, the safety of the fixing.
This guide sets out the practical differences for tradesmen and for anyone moving into the plastering, dry-lining or decorating trades. It covers shape, proportion, materials and room suitability, and it flags the regulatory and safety points that separate a professional install from a bodge.
The Short Answer
Coving is the simpler of the two. It is a plain, concave moulding with a single curved face, usually a quarter-circle or a gentle “C” profile, that bridges the corner between wall and ceiling. There is no detailing, no stepped relief, just a smooth sweep. Because the profile is simple, coving tends to be lighter and quicker to run.
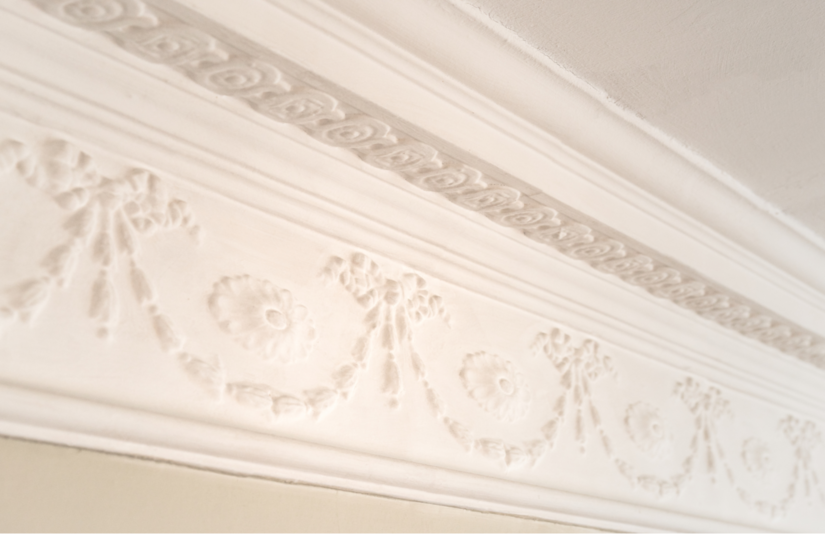
Cornice is the broader family. A cornice is any decorative moulding at the wall-ceiling junction, and it usually carries relief detail: steps, dentils, egg-and-dart, ogees, or a run of mouldings stacked into one profile. Cornice is generally deeper, heavier and more ornate.
Here is the cleanest way to hold the coving vs cornice difference in your head:
- All coving is a form of cornice.
- Not all cornice is coving.
- "Coving" reads as clean, modern and budget-conscious.
- "Cornice" reads as period, decorative and higher-value.
On a quote, the word you choose sends a signal. Clients pick up on it, so match the term to what you are actually fitting.
Differences in Shape
Shape is the first thing to assess because it drives everything downstream: how the piece sits, how you mitre it and how you make good.
Coving
Coving has a consistent concave face. Whether it is a true C profile or a plain cove, the geometry is symmetrical top to bottom, which makes marking out and cutting straightforward. The wall drop and ceiling projection are usually equal, so it sits at a clean 45-degree spring off the corner.
Cornice
Cornice profiles are rarely symmetrical. A classic cornice might have a large ceiling projection with a shallow wall drop, or a stepped face that throws shadow lines across the room. Those steps and reliefs are the whole point of the piece, but they complicate the work.
- Internal and external mitres must be cut so the detail lines up perfectly across the corner.
- Any error is far more visible than it would be on a plain cove.
- On ornate cornice, many fitters cut mitres by hand with a fine-tooth saw and a template rather than trusting a standard mitre box, because the block sizes do not fit a generic box neatly.

Differences in Proportion
Proportion is where a lot of installs go wrong, and it is worth treating as a design decision rather than a default.
Coving is typically supplied in modest sizes, often around 90mm to 127mm of face measurement, which suits standard ceiling heights of roughly 2.4m found in most modern housing. A slim cove keeps the ceiling feeling open and does not crowd a low room.
Cornice runs bigger. Period and high-end cornice can measure 150mm, 200mm or considerably more across the face, and it is designed for the taller ceilings of Georgian, Victorian and Edwardian rooms, or for grand commercial spaces.
A few working rules experienced fitters rely on:
- Scale the moulding to the ceiling height and room volume, then check it against the client's expectation before you order.
- Drop a deep, ornate cornice into a low new-build and the room feels compressed.
- Run a slim cove around a four-metre period ceiling and it looks mean and undersized.
Getting proportion wrong is an expensive mistake because it is only obvious once the piece is up.
Differences in Materials
Material choice is where the coving vs cornice decision meets both cost and safety, so it deserves close attention.
Gypsum Plaster
The traditional and still most common material for quality work. Gyproc cove and cornice from British Gypsum, and fibrous plaster mouldings from specialist manufacturers, are made from a formulation of gypsum plaster and water. Gypsum plaster is a natural mineral, non-hazardous and non-combustible.
That fire behaviour is a genuine advantage, but it needs stating precisely. Reaction to fire is classified under BS EN 13501-1, which runs from A1 (non-combustible, no contribution to fire) down to F. Gypsum plaster products achieve a high reaction-to-fire class, typically A1 or A2 depending on the specific product. Standard plasterboard, for example, is commonly declared A2-s1,d0 rather than A1 because of its paper liner, while a solid cast plaster cove sits closer to non-combustible.
The practical point for the fitter:
- Do not assume any plaster moulding is automatically A1.
- Check the product's Declaration of Performance for its actual class.
- Reaction-to-fire class describes the product itself. It is not the same as a fire-resistance rating (30, 60 or 90 minutes), which only comes from a fully tested wall or ceiling system.
Plaster of Paris and Fibrous Plaster
Used for ornate, bespoke and restoration cornice. Fibrous plaster is cast in moulds over a hessian and timber backing, which lets you reproduce heavy period detail and long runs at a workable weight. Note that the timber and hessian backing is organic, so a fibrous cornice is not the same fire proposition as a solid gypsum cove. It remains the go-to for listed-building and heritage work where the profile must match existing.
Polyurethane and Polystyrene
Lightweight foamed mouldings that mimic both coving and cornice profiles. They are light, quick to fix with adhesive and resist moisture, which makes them popular in some fit-outs. The trade-off is fire performance:
- Foamed plastics do not carry the A1 or A2 rating that plaster does.
- They behave very differently in a fire.
- On any job where fire class is specified, check the declared classification before you fit, and never assume a foam profile is a like-for-like swap for plaster.
MDF and Timber
Used mainly where a painted, crisp-edged modern cornice is wanted, or where the moulding also needs to take fixings. Combustibility and moisture behaviour differ from plaster, so specify with the room and the regulations in mind.
Safety on Site
Two hazards deserve a direct mention.
- Weight and fixing: Heavy plaster and fibrous cornice can weigh a significant amount per length, and a poorly bonded run coming down is a real hazard. Follow the manufacturer's fixing guidance to the letter and support heavier lengths while the adhesive cures.
- Dust and PPE: Cutting plaster, and MDF in particular, generates respirable dust. Wood dust from MDF is a recognised health risk under COSHH, so use suitable dust extraction or an FFP-rated mask and eye protection when cutting.
Fixing and Installation
The core method is similar for coving and lightweight cornice, but the margins for error tighten as the piece gets heavier.
For plaster cove and cornice, the recommended fixing is a proprietary adhesive such as Gyproc Cove Adhesive from British Gypsum, formulated for grab on both plasterboard and plastered walls, and doubling as a filler for mitres and gaps. As a working guide, roughly 1kg of adhesive fixes around 3m of cove, setting in around 45 minutes, though you should always confirm coverage against the current data sheet.
Sound preparation is non-negotiable:
- Set out a level line around the room rather than following the ceiling, which is rarely true.
- Scratch-key both the ceiling and wall contact faces so the adhesive bonds to a sound, clean surface.
- On heavier lengths, tap temporary pin nails or drive screws in as supporting guides while the adhesive cures, then remove or make good.
- Butter both edges, press home, and clean off squeeze-out before it sets.
For ornate cornice, dry-fit and mark your mitres first, because there is no forgiving a cut that leaves the detail out of line. Finish with emulsion or another water-based paint on plaster, which suits the material and lets it breathe. Reserve oil-based systems and sealers for foam or timber profiles where the manufacturer calls for them.
TradeFox includes guided simulations that allow learners to practise trade procedures and review each stage at their own pace. This supports skills development but does not replace product instructions, supervised training or practical site experience.
Room Suitability
Matching the moulding to the room is where the coving vs cornice choice earns its keep.
Modern Homes and Low Ceilings
Plain coving is usually the right call. It reads as clean and current, keeps a standard-height room feeling open, and installs quickly. It suits new-builds, flats and contemporary refurbishments.
Period Properties and Tall Ceilings
Cornice comes into its own. Deeper, detailed profiles suit the proportions of older rooms and are often what a heritage or restoration brief demands. On listed work you may be tied to matching an existing profile, which points to fibrous or cast plaster.
Bathrooms, Kitchens and Damp-Prone Rooms
Moisture resistance moves up the priority list. Some fitters reach for foamed profiles here for their moisture tolerance, but weigh that against the fire-class trade-off, especially in flats and shared buildings.
Commercial and Fire-Critical Spaces
Escape corridors, hospitality and any space working to a specified fire class will usually favour non-combustible plaster. Confirm the declared reaction-to-fire classification before you commit.
A Note on Regulations Across the UK
Approved Document B (fire safety) is the guidance that covers internal fire spread over wall and ceiling linings in England. Requirement B2 deals specifically with the fire performance of internal linings. Scotland works to its own Technical Handbooks, Wales has its own version of the Building Regulations, and Northern Ireland operates the Technical Booklets. The principles are similar, but check the regime for the nation you are working in rather than assuming one document covers the whole UK.
Getting the Specification Right
The choice between the two products is not just terminology. It sets the shape, the proportion, the material, the fixing method and the fire performance of the finished job.
- Read the room and the ceiling height.
- Match the profile to the property's era and the client's expectation.
- Check the material's reaction-to-fire class against what the regulations require for that building.
- Fix strictly to the manufacturer's guidance, especially on heavier plaster and fibrous runs where a failed bond is a safety issue, not just a cosmetic one.
Nail those points and you deliver a finish that looks right, meets the regulations and stays where you put it.