For interior finishing carpenters, joiners, and restoration specialists, the installation of picture rails requires a balance of historical accuracy, aesthetic proportion, and structural integrity. Unlike standard skirting boards or architraves which have fixed installation points, determining the correct picture rail height requires an understanding of ceiling proportions, architectural eras, and the intended hanging systems.
This guide provides technical specifications, historical context, and safety first installation practices for professionals in the trade. First fix carpentry sets the stage, but the final finishing details dictate the overall quality of the build.
Tradesmen must execute these installations with precision to avoid compromising the visual proportions of the room or the structural safety of the walls.
Establishing The Datum: Rules Of Thumb For Installation
The primary function of a picture rail is to support the weight of framed artwork and mirrors, preventing damage to the plasterwork. Its secondary function is architectural, serving to break up large expanses of wall and create a proportional frieze below the ceiling or cornice.
When establishing the datum line for installation, professionals should rely on established rules of thumb rather than arbitrary measurements. The correct picture rail height is dictated directly by the ceiling height of the room. Using a high-quality rotary laser level is the most efficient way to cast a continuous datum line across all four walls simultaneously.
Standard Ceiling Proportions
A widely accepted architectural standard is to position the moulding somewhere between one fifth and one-quarter of the way down from the ceiling.
- For standard modern ceilings measuring 2.4 metres, the rail is typically positioned 300mm to 500mm below the ceiling.
- For high ceilings measuring 2.7 metres to 3.0 metres, the moulding should sit between 500mm and 750mm below the ceiling.
- Measurements should always be taken from the ceiling down, rather than the floor up, to account for any discrepancies or runout in the floor level.
Architectural Alignment Methods
A highly effective method for ensuring visual harmony in a room is to align the installation with existing architectural features.
- The most common practice is to run the timber continuously at the exact height of the door architrave headers or window frames.
- This creates an unbroken horizontal datum line around the perimeter of the room.
- If the window and door heights differ, standard practice dictates aligning the timber with the tallest prominent feature, usually the main entry door header.
Period Authenticity Versus Modern Applications
Tradesmen working on heritage plasterwork restoration projects must understand the distinct styles of different architectural periods. Installing a profile that clashes with the era of the building, or setting it at the wrong level, compromises the integrity of the project.
Victorian And Edwardian Properties
Victorian architecture is characterized by grand proportions and high ceilings.
- In these properties, the moulding was traditionally set lower than in later eras to create a deep decorative frieze between the timber and the heavy plaster cornice.
- This frieze was often finished in a contrasting colour or textured wallpaper.
- When working on Victorian restorations, expect to set the timber anywhere from 500mm to 900mm below the ceiling, depending on the overall height of the room.
Edwardian properties maintained high ceilings but often featured lighter, less imposing mouldings.
- The frieze space in Edwardian homes is typically shallower, meaning the timber sits slightly closer to the cornice than in a typical Victorian layout.
Interwar Properties From The 1920s And 1930s
During the interwar period, ceiling heights began to drop across residential buildings.
- In the 1920s and 1930s homes, the moulding was often placed much higher, sometimes sitting a mere 150mm to 200mm below the ceiling line.
- In many properties from this era, the timber sits almost flush against a minimal coving.
- When matching an existing picture rail height in a heritage restoration from this period, precision is necessary, as small deviations are highly visible in tight frieze spaces.
Modern And Contemporary Installations
In contemporary builds, traditional timber profiles are often replaced by minimalist aluminium gallery systems.
- These modern tracks are frequently installed directly at the ceiling junction to act as a shadow gap, or they are recessed flush into the plasterboard.
- The goal in modern applications is absolute utility without the decorative profile of timber mouldings.
Hazard Identification: Asbestos, Silica, And Services
Before breaking the surface of any wall, tradesmen must adhere strictly to UK health and safety protocols.
Failing to identify hazards before drilling can lead to severe health consequences and property damage.
- Asbestos Containing Materials pose a significant risk in properties constructed or refurbished prior to the year 2000. There is a legal requirement under the Control of Asbestos Regulations to assume these materials may be present in plaster finishes or textured ceiling coatings. An asbestos register must be consulted before drilling near the ceiling line.
- Drilling solid masonry generates respirable crystalline silica dust. In strict accordance with COSHH regulations, operatives must mitigate silica dust exposure by using M Class on tool dust extraction and wearing FFP3 graded respiratory protection.
- Concealed services present a major hazard during installation. While BS 7671 safe zones dictate expected electrical routes, legacy plumbing does not follow these rules. Microbore heating pipes and old gas lines are frequently chased into walls at unpredictable levels. A multi-material scanner must be used to locate both ferrous metals and non-ferrous copper or plastic pipework before establishing the final picture rail height.
Structural Integrity and Load-Bearing Wall Fixings
A hanging system is a load bearing fixture. Tradesmen must ensure the installation can support dynamic and static loads, especially when clients intend to hang heavy mirrors or large framed glass.
Navigating Safe Zones Under BS 7671
Before any drilling or fixing begins, professionals must conduct a thorough sweep of the installation line.
- According to UK wiring regulations outlined in BS 7671, electrical cables run in defined safe zones.
- These include a 150mm band radiating from the corners of a room and horizontally along the top of the wall where it meets the ceiling.
- Cables also run vertically and horizontally from switches and sockets.
Because the timber runs continuously around a room, it will inevitably cross vertical cable runs and may sit within the top horizontal safe zone. The use of a high-quality CAT scanner or cable detector is a mandatory requirement. Never assume cables follow straight lines, especially in older properties that have undergone multiple renovations.
Substrate Identification And Fixing Methods

The choice of load bearing wall fixings is entirely dependent on the matrix of the wall.
- Solid masonry walls constructed of brick or block require high quality nylon wall plugs. These are typically red or brown, matched with 4.0mm to 5.0mm gauge wood screws. Heavy 6.0mm screws will likely split delicate timber profiles. Ensure the masonry drill hole exceeds the plug length to prevent the nylon from sitting proud, which will push the timber away from the wall and distort the finished alignment.
- Lath and plaster walls are incredibly common in pre 1930s homes. Finding the vertical timber studs is absolutely necessary for a secure hold. Modern stud detectors often struggle with the density of lath and plaster. Professionals should locate the studs by sounding the wall or carefully probing behind the skirting board. Fixings must anchor securely into the stud using heavy gauge wood screws. Never rely on the lath alone to bear weight.
- Modern studwork utilizing plasterboard presents its own challenges. If the horizontal line of the timber does not align with horizontal noggins, the moulding must be secured to the vertical uprights. These are typically spaced at 400mm or 600mm centres. Where fixings must land between studs to keep the timber tight to a bowed wall, heavy duty hollow wall anchors should be used, but the primary load bearing fixings must remain anchored in the structural timber
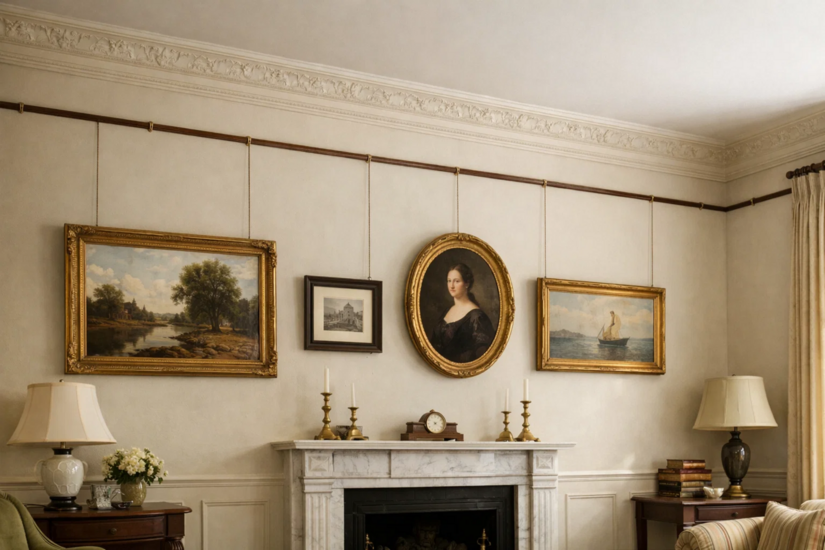
Advanced Picture Hanging Systems
Understanding how the end user will interact with the installation dictates the type of rail specified and the finishing methods utilized by the carpenter.
Traditional Hook Systems
Traditional timber rails are designed to accept brass or steel moulding hooks.
- These hooks curve over the convex top of the profile.
- When installing a timber rail intended for traditional hooks, tradesmen must ensure a sufficient gap is left between the top of the timber and the wall surface if the wall is bowed.
- The top edge must never be caulked or filled, as this blocks the metal hooks from seating correctly and safely bearing weight.
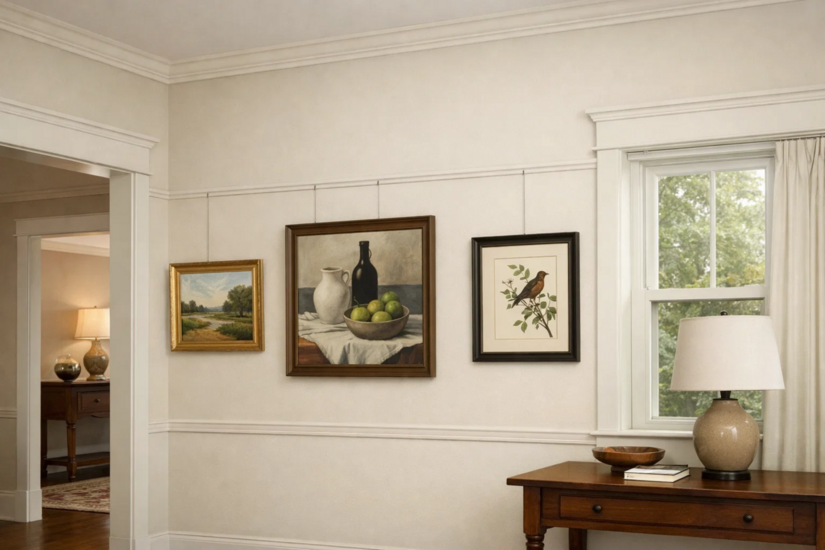
Modern Track And Cable Systems
For commercial galleries or high-end residential projects requiring frequent art rotation, modern track systems are highly preferred. These include heavy-duty J rails, clip rails, and ceiling-mounted tracks.
- These modern systems utilize transparent nylon cords or braided steel cables suspended from specially designed gliders that track inside the aluminium extrusion.
- When installing these systems, standardizing the height across a multi room project ensures that cables and adjustable locking hooks can be moved seamlessly from room to room without requiring different cable lengths.
These modern systems require perfectly flat substrates to function correctly. Any undulation in the plasterwork will cause the rigid aluminium track to distort, which can prevent the internal gliders from sliding smoothly. In such cases, the wall must be perfectly prepared and filled, or solid packers must be used behind the track prior to final fixing. If you’re fitting picture rails and want fewer do-overs, brush up on the measuring and fixing fundamentals with Tradefox, then apply the same checks on your next room.
Conclusion
Executing this installation is a precise architectural finishing task that requires skill and knowledge.
By adhering to proportional rules of thumb, respecting the historical era of the property, and applying rigorous safety standards regarding dust extraction and electrical zones, tradesmen can deliver an installation that is structurally robust.
Whether dealing with heavy Victorian timber profiles or sleek modern gallery tracks, the core principles of secure fixing, hazard identification, and accurate datum alignment remain the foundation of top tier professional practice.