Mastering complex tile layouts separates standard tradesmen from elite tiling professionals. Herringbone Tiles Explained is a necessary topic because this specific geometric pattern demands uncompromising precision and technical understanding.
This comprehensive guide details the mathematical setting-out rules, British Standard compliance, and advanced cutting strategies required to execute this layout flawlessly. By adhering strictly to these professional protocols, installers can guarantee both the structural integrity and the aesthetic perfection of their work.
Understanding the Geometric Complexity
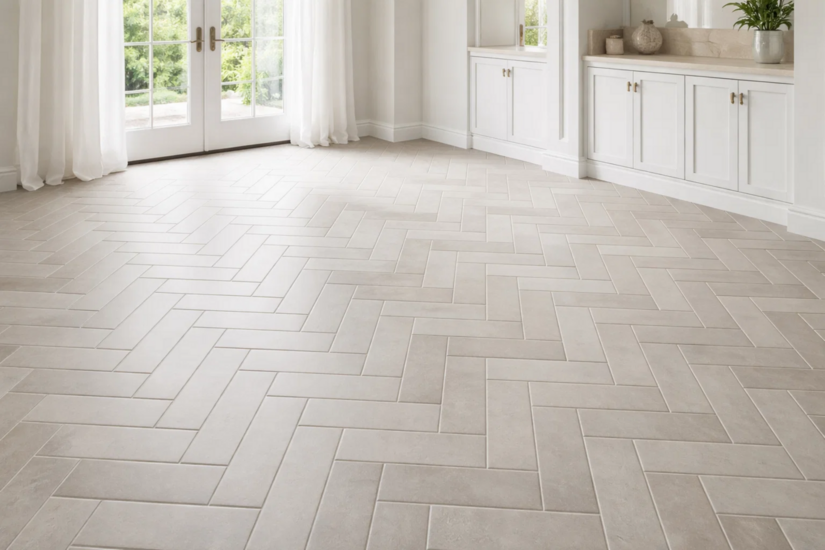
The herringbone pattern consists of rectangular tiles laid at a precise forty-five-degree angle to the main axis of the room or wall. The end of one tile abuts the side of another at a perfect ninety-degree angle, creating a continuous interlocking zigzag sequence.
This geometric arrangement visually expands spaces but introduces significant installation challenges. Any slight deviation in the initial alignment compounds rapidly across the surface area. A one-millimetre error on the first row can translate into a ten-millimetre misalignment by the time the pattern reaches the opposite wall. Therefore, relying on visual guesswork is entirely unacceptable for professional tradesmen.
British Standards and Substrate Preparation
A successful installation begins long before the first tile is cut. British Standard BS 5385 strictly dictates substrate tolerances for wall and floor tiling. Herringbone layouts immediately highlight any substrate imperfections. Lippage, which is the vertical displacement between adjacent tiles, becomes highly visible when using elongated rectangular tiles in an interlocking pattern.
Floor screeds must meet an SR1 surface regularity tolerance. This classification mandates a maximum deviation of three millimetres under a two-metre straight edge. Wall substrates must be equally plumb and flat. If the substrate fails to meet these tolerances, the installer must apply an appropriate self-levelling compound to floors or render to walls before tiling commences.
Furthermore, the installer must correctly identify the substrate material to prevent catastrophic chemical failures. Anhydrite screeds require entirely different preparation protocols compared to traditional sand and cement screeds. As anhydrite cures, a weak, powdery surface layer called laitance naturally forms. The tradesman must mechanically remove this laitance via sanding or grinding before proceeding.
Applying a cementitious tile adhesive directly to unprimed anhydrite, or directly onto laitance, causes a chemical reaction called ettringite formation. This reaction destroys the bond, leading to massive debonding across the entire floor.
Following mechanical preparation, the substrate must be primed using an appropriate styrene-butadiene rubber or acrylic primer. Standard polyvinyl acetate primer is strictly forbidden in professional tiling because it re-emulsifies upon contact with the moisture in the tile adhesive.
Setting-Out Rules for Professional Precision
To get Herringbone Tiles explained properly, we must focus heavily on the mathematical setting-out phase. You must never start tiling from a random corner of the room. Rooms are rarely perfectly square, and starting from an out-of-plumb corner will skew the entire installation.
Find the exact physical centreline of the room or the focal wall. Strike a primary chalk line down this centre axis. Next, strike a perpendicular line to create a perfect crosshair intersection.
The apex of the very first directional chevron in your pattern must align perfectly with this central vertical axis. To maintain this forty-five-degree angle accurately, professionals utilise a speed square or a custom-cut wooden template. Secure a temporary timber batten along the horizontal chalk line to support the first row of tiles if you are working on a wall. This prevents the heavy tiles from slipping down the wall while the adhesive cures.
Professionals always conduct a dry lay before mixing any adhesive. Create a custom gauge stick marked with the tile width plus the exact grout joint width. This measuring tool predicts how the pattern will interact with the perimeter walls and architectural features. Small, sliver cuts at the edges look incredibly unprofessional and compromise the structural integrity of the perimeter joint.
If your gauge stick reveals a tiny sliver cut at the skirting board, you must adjust your primary centreline slightly to verify you achieve substantial, aesthetically pleasing perimeter cuts.
Cutting Strategies and Waste Management
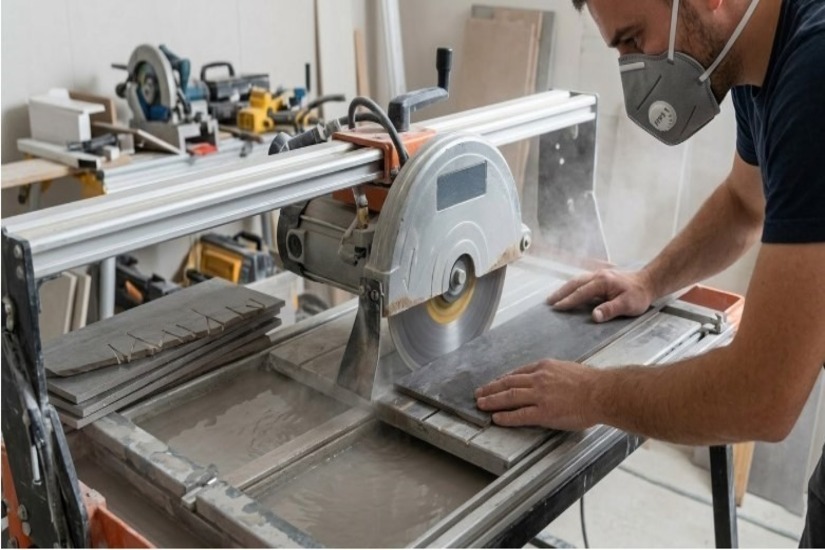
The sheer volume of cuts required is the primary challenge of this interlocking pattern. Getting Herringbone Tiles Explained accurately requires acknowledging the heavy waste factor. Standard parallel tiling layouts require around ten percent waste allowance. Herringbone layouts require a minimum of fifteen to twenty percent waste allowance due to the complex perimeter intersections and internal corners.
Tool selection directly impacts the quality of your cuts. Manual snap cutters are sufficient for standard straight perimeter cuts, provided the scoring wheel is sharp and correctly sized for the tile thickness. When cutting dense porcelain, score the tile once firmly to prevent micro-fracturing the surface glaze. Multiple scores lead to jagged, unacceptable edges. For complex cuts around architraves, electrical sockets, or pipework, use a high-quality wet saw equipped with a continuous rim diamond blade.
Wet cutting is also a mandatory safety measure. Cutting ceramic and porcelain tiles dry generates high volumes of Respirable Crystalline Silica dust. This dust poses a severe, long-term risk to respiratory health, leading directly to silicosis. Using water suppression on your cutting equipment, combined with an FFP3 rated respirator mask, is a non-negotiable health and safety requirement on any professional site.
Adhesive Application, Trowel Techniques, and Levelling

Elongated rectangular tiles are prone to slight bowing during the high-temperature manufacturing process. This natural bowing exacerbates lippage during installation. To counteract this physical characteristic, professionals employ the back-buttering technique alongside a correctly sized notched trowel. Large format rectangular tiles used in herringbone patterns generally require a minimum of a ten-millimetre or twelve-millimetre square notch trowel, or a specialized solid bed trowel, to achieve the necessary adhesive thickness.
Apply a thin, flat layer of adhesive directly to the back of the tile using the straight edge of your trowel. Next, apply adhesive to the substrate using the notched edge. You must comb the adhesive in straight, parallel lines rather than swirling patterns. Comb the ridges parallel to the short edge of the tile. This straight-line technique allows trapped air to escape easily as the tile is bedded into place. Under BS 5385, floor tiling and wet areas require a solid bed of adhesive, meaning one hundred percent coverage with zero voids.
Monitor the open time of your adhesive constantly. If the adhesive ribs begin to skin over and lose their tackiness, you must scrape the adhesive off the substrate and apply a fresh batch. Bedding tiles into skinned adhesive guarantees an eventual installation failure.
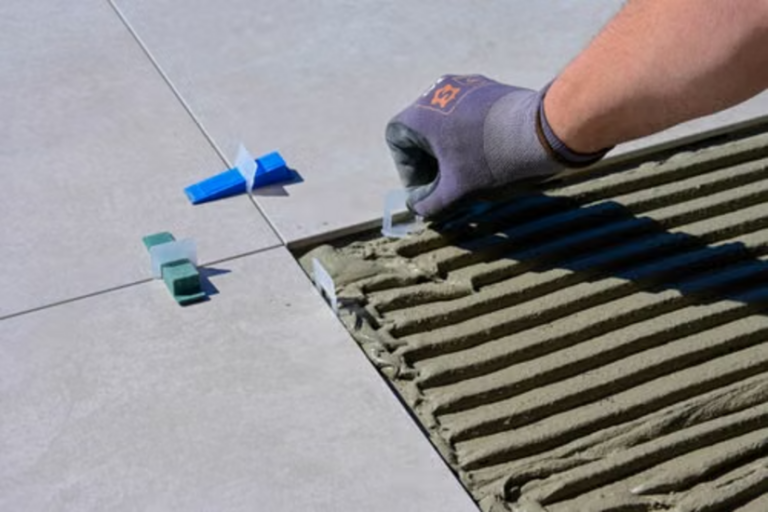
Modern professionals rely heavily on mechanical tile levelling systems to eliminate the lippage inherent in long porcelain planks.
These systems utilise disposable plastic clips placed under the tile edges and reusable wedges driven through the clips. The wedges pull the adjacent tiles perfectly flush while the adhesive cures. Once the adhesive sets, the tradesman kicks the clips away, leaving a perfectly flat, lippage-free surface.
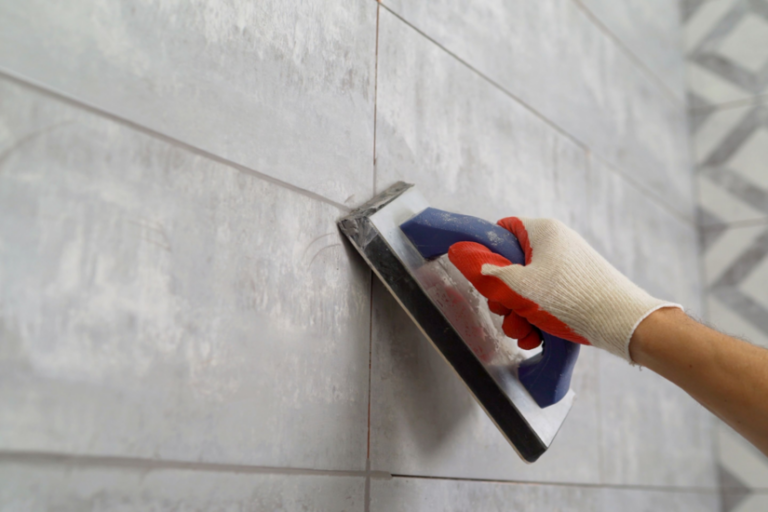
Grouting and Movement Joints
The final phase involves grouting and managing thermal expansion. Herringbone patterns feature significantly more linear metres of grout joints than standard grid layouts. When working with highly porous natural stone tiles or crackle-glaze ceramics, you must apply a penetrating sealer before grouting. Failing to seal porous tiles allows the fine grout pigments to stain the tile surface permanently.
Thermal expansion and contraction affect all tiled surfaces. British Standards mandate the inclusion of movement joints to accommodate this physical shift. Never rigidly grout the internal corners of a room or the perimeter where the floor meets the wall. These specific junctions must be kept entirely free of hard cementitious adhesive and grout. Instead, they must be filled with a highly flexible, sanitary silicone sealant.
For standard, stable internal environments, intermediate expansion joints must be installed every eight to ten linear metres. However, if the floor incorporates underfloor heating or is subjected to high thermal variations, such as in a conservatory, the frequency of movement joints must be increased to every five to six linear metres. Omitting this detail risks immediate non-compliance and severe cracking on modern residential sites.
Build the right habits and sharpen your technique with Tradefox, so layout precision, setting-out rules, and cutting strategies all hold up over time.
Conclusion
Executing this specific layout requires meticulous planning, advanced geometry, and a deep understanding of setting-out rules. By adhering strictly to the structural tolerances set by British Standards, controlling your centrelines, and applying professional cutting strategies, tradesmen can deliver flawless, high-end installations.
Herringbone Tiles Explained in this manner moves the conversation away from basic aesthetic design choices and grounds it firmly in professional, standards-compliant structural engineering. Applying these exacting standards protects the longevity of the installation and elevates the reputation of the tradesman.