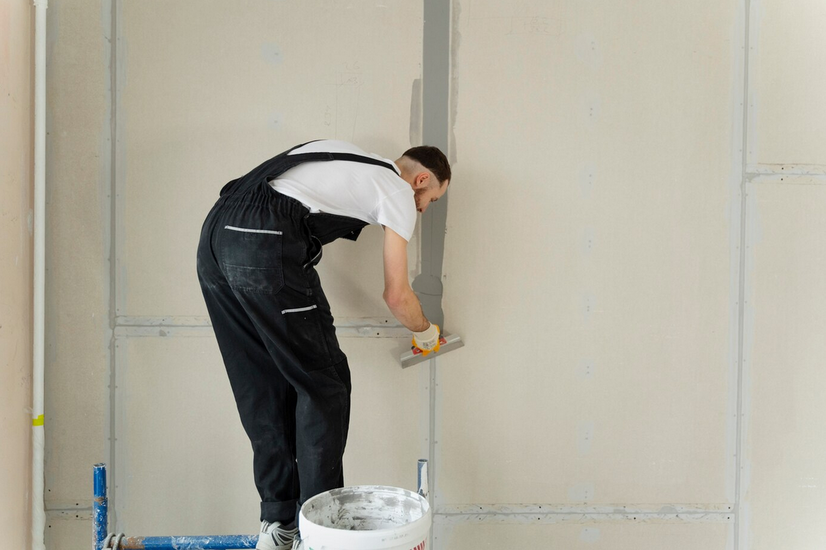
When you walk into a freshly plastered room and run your hand across the walls, you can feel it instantly, no bumps, no lines, no unevenness.
Just a smooth, continuous finish that makes paint glide on like silk. That kind of result isn’t luck or guesswork, it’s the mark of a skilled plasterer with the right tools in hand.
Whether you’re a seasoned professional plasterer or a determined DIY enthusiast, achieving a flawless surface boils down to two things: technique and equipment.
And while no tool can replace a steady hand, investing in high-quality tools can dramatically improve the quality of your work.
Let’s unpack the essential gear pros rely on during every plastering project, especially when the goal is precision and polish, not just slapping mud on a wall.
Why The Right Tools Matter?
Here’s a simple truth: the plastering process is unforgiving. Unlike paint, you can’t just roll over your mistakes.
Using cheap or poorly designed tools often leads to uneven layers, dragged surfaces, and fatigue. Over time, that’s not just bad for business, it’s brutal on your body.
But tools with an ergonomic design, made from materials like stainless steel or carbon steel, offer a different experience. They’re lighter, easier to maneuver, and they hold up under pressure. In other words, they help you work smarter, not harder.
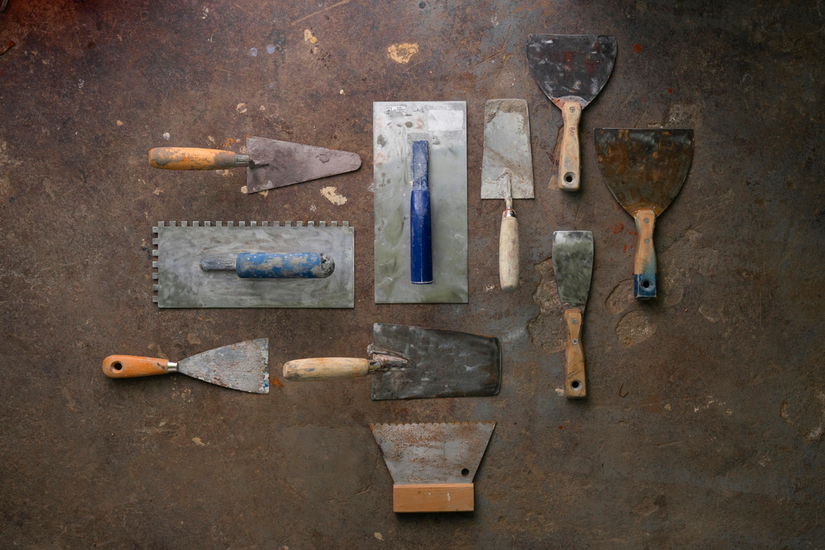
Core Hand Tools Every Plasterer Swears By
1. Plastering Trowel: Your Primary Weapon
Let’s start with the obvious, but essential tool: the plastering trowel. This isn’t just a rectangle with a handle. It’s your brush, your blade, your control surface.
Look for:
- Stainless steel blades for rust resistance and easy cleaning.
- Pre-worn edges to reduce trowel marks on finishing passes
- Comfortable grips with ergonomic design to reduce wrist strain
High-end trowels designed for precision don’t flex too much but have enough give to ride over imperfections while keeping the coat consistent. Skimp here, and you’ll fight every inch of your wall.
2. Hawk: The Unsung Hero
Holding wet plaster in your hand might sound simple until you’ve done it for hours. A good hawk, preferably magnesium or aluminum, balances well and saves your shoulder.
Plastic ones are fine for short jobs, but they warp over time. If you want stability and speed, invest in a quality hawk early on.
3. Bucket Trowel: Built For Transfer, Not Finish
A bucket trowel is an essential tool when scooping plaster from your mixing bucket to your hawk.
But don’t confuse it with a plastering trowel, it’s got a stubbier shape, designed to get into the corners of the bucket without spillage. Look for blades that are rigid and wide enough to transfer material without waste.
Tools That Speed You Up Without Sacrificing Precision
4. Speed Skim / Spatula Rule
These aren’t new kids on the block anymore. Professionals have been embracing Speed Skims for years, and for good reason.
These wide, flexible tools glide across walls, spreading pressure evenly and flattening vast surfaces quickly.
Want to reduce the number of trowel passes and avoid fatigue? This is your shortcut, especially on ceilings or commercial walls.
Blades come in plastic and stainless steel, so you can adjust based on the plaster type and finish goal.
5. Feather Edge / Darby
When it comes to leveling large areas before the final skim, nothing beats a solid feather edge.
These tools are usually made of aluminum or carbon steel and help identify hollows and high spots fast.
Used after the plaster is on the wall but before the finish pass, they’re your best bet for eliminating lippage and warping.
Don’t Forget The Details: Corner Trowels And More
6. Corner Trowels: Precision In Tight Spaces
Ever tried to hand-trowel a 90-degree internal corner? It’s where amateur work becomes glaringly obvious. Corner trowels, whether internal or external, are built for these challenges.
They’re angled perfectly and apply pressure evenly on both surfaces, ensuring crisp, consistent corners. For the professional finish that clients expect, these are indispensable.
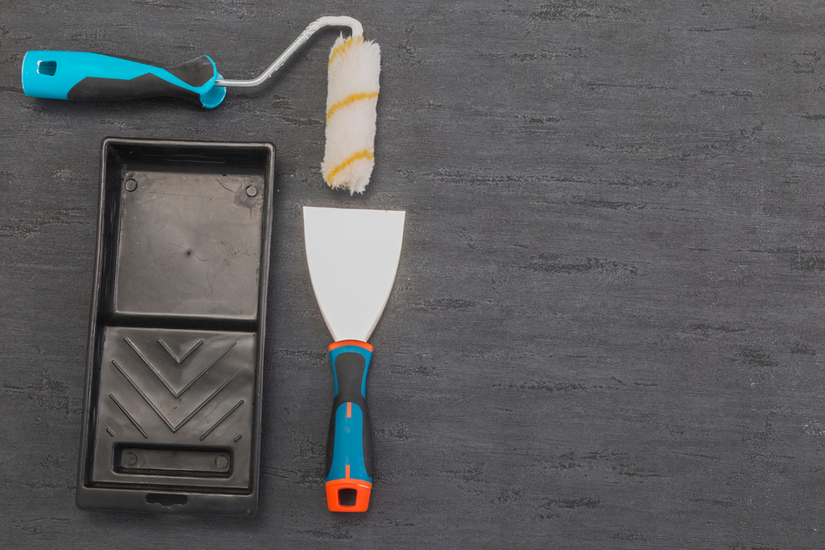
7. Joint/Taping Knife
This slim, flexible blade is your go-to for blending edges, filling gaps, or feathering plaster between drywall boards. It’s not just for joint compound, many plasterers use it for tight cuts and awkward angles where a large trowel won’t fit.
The Final Polish: Finishing Tools That Matter
8. Plastic Trowels
Steel trowels are great for most stages, but for polishing that smooth finish on the final pass, a plastic trowel shines. It won’t leave black marks or burnish the plaster, making it perfect for topcoat work.
9. Sponge Float
If you’re working with traditional lime or cement-based plasters, a sponge float helps draw moisture to the surface, tighten up the material, and close small pores. It also gives a light texture that many clients love in rustic or Mediterranean finishes.
10. Flex Trowels Or Polishing Pads
These tools are built for ultra-fine smoothing, particularly during the final skim. If your goal is glassy walls or a finish so smooth you don’t want to paint it, these are the tools that get you there.
Supporting Tools That Keep You Efficient
11. Mixing Tools
An often-overlooked part of the plastering process is mixing. A low-quality paddle or an underpowered drill leads to lumpy plaster and inconsistent drying. That wrecks your wall before you even touch it.
Look for:
- Variable speed mixers
- Helical paddle designs for even mixing
- Buckets with volume markings to ensure consistency across batches
A well-mixed batch makes everything easier, from application to smoothing.
12. Laser Levels And Spirit Levels
Precision isn’t just about smoothness, it’s also about alignment. Use a laser level to mark consistent heights across a room or line up new plaster with existing surfaces. You can’t eyeball perfection.
13. Plasterer’s Stilts Or Step-Ups
Working ceilings or tall walls? Constantly climbing up and down a ladder is a pain, and it throws off your rhythm. Stilts or mobile step-ups give you fluid access to upper areas without interrupting your trowel stroke.
Choosing The Right Tools: A Word To The Wise
You don’t need every tool under the sun to start. What you do need is gear that matches the scale of your plastering jobs.
Ask yourself:
- Are you doing skim coats or full float and set?
- Working on drywall or solid masonry?
- Indoors or outside?
Start with the core tools: plastering trowel, hawk, bucket trowel, corner trowels, and mixing gear. From there, build based on your niche.
And yes, it’s worth investing in high-quality gear. Cheap tools not only slow you down, they affect the quality of your work and how long your body holds up.
Oh, and don’t forget maintenance. Always clean your blades immediately after use. A bit of oil on carbon steel tools helps prevent rust. Hang or store trowels flat, warped gear is useless when precision matters.
Want To Level Up Your Skills Before Your Next Plastering Job?
Knowing your tools is half the battle. Using them correctly? That’s where the learning never stops.
If you’re looking to sharpen your craft or get hands-on practice in a safe, low-pressure environment, check out TradeFox.
It’s an interactive training platform that simulates real-world trade tasks, plastering, electrics, plumbing, and more. One simulation at a time, you’ll build your confidence and skills with zero risk and full control over your pace.
Whether you’re prepping for your first solo plastering project or fine-tuning advanced techniques, TradeFox makes that next step a whole lot smoother.
Final Thoughts
Precision plastering is as much about mindset as it is about muscle. You need patience, attention to detail, and yes, the right tools in your kit.
From your trusty plastering trowel to a feather edge that makes walls sing, each tool plays a role in achieving a smooth, professional-grade finish.
So don’t just follow the crowd. Build your toolkit with intention. Master each piece one by one. And remember, the difference between a decent job and a professional finish often lies in the gear you choose and how well you use it.